When starting a QuickBooks Online company, you are provided with a basic chart of accounts. It’s basic, but can get you started. But, if you start customizing the QuickBooks Online chart of accounts, amazing things can happen for your business.
The chart of accounts is the backbone of your business accounting setup. If your chart of accounts is disorganized, then your financials will feel disorganized and you’ll feel less confident in making business decisions based on the numbers. If you customize your chart of accounts to fit your business, then you’ll be able to review your financials with more confidence and actually utilize them to help you make some really important decisions.
How Do I Customize the QuickBooks Online Chart of Accounts?

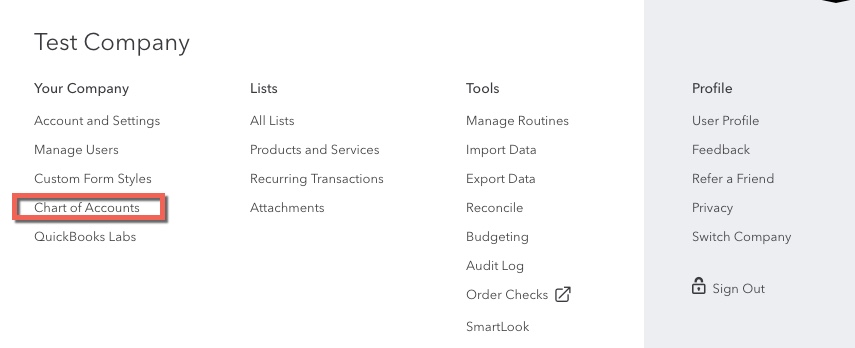
It’s super easy. In QuickBooks Online, click on the gear icon on the top right of the screen, then under “Your Company”, click “Chart of Accounts”.
Once on the chart of accounts screen, you can (1) bulk edit accounts already listed, (2) add new accounts and (3) archive old accounts.

Editing your list is one thing, but how do you go about really creating a chart of account listing that will benefit your business? Keep on reading!
The Strategy Behind Customizing the QuickBooks Online Chart of Accounts
Yes, there is a strategy here. The more thought and planning you put into customizing your chart of accounts, the more benefit you’ll get out of your financials. And, seriously, those reports can be a wealth of knowledge for a business owner. So, what do you need to consider?
1. Consider Your Industry
Hands down, we first need to consider your industry when customizing your chart of accounts. For example, a nonprofit is going to have a completely different chart of accounts as a construction company. And a construction company is going to be different from a retail business. So, when you consider your industry, I want you to think about what accounts are necessary for you to operate. Nonprofits need a restricted funds account. Construction companies usually need accounts to help properly account for the percentage of completion accounting method. Retail businesses usually need inventory accounts. So, in your industry, what accounts are a requirement when customizing your QuickBooks Online chart of accounts?
2. Identify Your Departments (or Your Segments of Operations)
If you are thinking, “I don’t have any departments”, bear with me. This applies to you too.
In every business, there are different segments of operations or different buckets of things to work about when running a business. Usually, you’ll be able to notice these most based on the types of expenses you have. What general administrative tasks do you have? Do you have a sales department or is that even a big area of your business? Do you consider sales a part of your marketing? Do you have a lot of technology to manage? What about your facilities? Do you have rent, utilities, maintenance, etc? I want you to determine these buckets of your business. I’d love to see you come up with about 5 and no more than 10.
Here is the reason behind this strategy of looking at your business based on these departments. When customizing your chart of accounts, you’ll want to group these accounts together. You’ll want all the revenue related to the department in one grouping and you’ll want all the expenses related to the department in another grouping (because revenue and expenses show up in different parts of the profit and loss statement). But, once you see your business (and the numbers) based on these operational buckets, you can get a bigger picture view of your business to make decisions. In other words, you won’t get lost in the details!
Best Practices for Customizing the QuickBooks Online Chart of Accounts
So you’ve worked through some strategy before customizing your chart of accounts. Now, let’s talk about some of the best practices.
- Upload Your Chart of Accounts
This is going to be your best time-saver here. You’ll want to plan everything out in an Excel file and then upload it into QuickBooks Online. It’s kind of hidden in QBO, but just go to the Chart of Accounts screen, then click the drop-down next to new and you’ll see the import option.

QuickBooks Online provides you with a sample file if you need help with knowing what fields are necessary on the upload. The import process is really easy. You might end up with a few errors at the end and this will be because you already have some of these accounts in your QuickBooks Online account. When you come across those, just add the account number on those and you’ll be good to go.
- Utilize Account Numbers
If I had it my way, I’d require this for everyone! Why? Because utilizing account numbers gives you the most amount of flexibility when customizing your chart of accounts. Usually, QuickBooks Online will organize your accounts based on (1) the type of account it is and (2) alphabetical order. You can’t change the type of account, but you can get around the alphabetical order by utilizing account numbers. And, when we use account numbers, we are able to group accounts based on those segments of our business! Yay!! (OK – so most accountants cheer at this one)
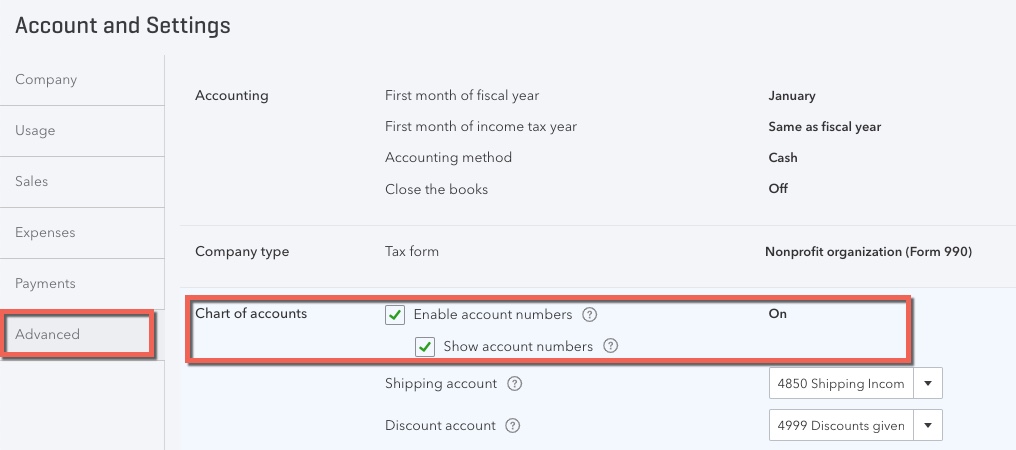
To turn on account numbers, just go to the gear icon on the top right of your QBO screen. Then, select “Account and Settings” under “Your Company”. Then, go to “Advanced” and turn on those account numbers, baby!

Once you have that setup, you can bulk edit your accounts from the Chart of Accounts screen (clicking that pencil icon). Or, you can even upload a template with everything already done for you.
- Take Advantage of Sub-accounts
Within each account, you have the option to create sub-accounts. Actually, you can create sub-sub accounts and go down to 5 layers deep. I just recommend one layer of sub-accounts. Here is why – it allows you to condense your financials into a nice pretty big picture view (think forest) of your business. This allows you the flexibility of adding a bit more detail when recording your transactions, but you can view your business based on those segments we figured out above. In the long run, this will also allow you to start to delegate those different segments to managers in your business, which they will have to report to you about. This is how you set your business up to grow.
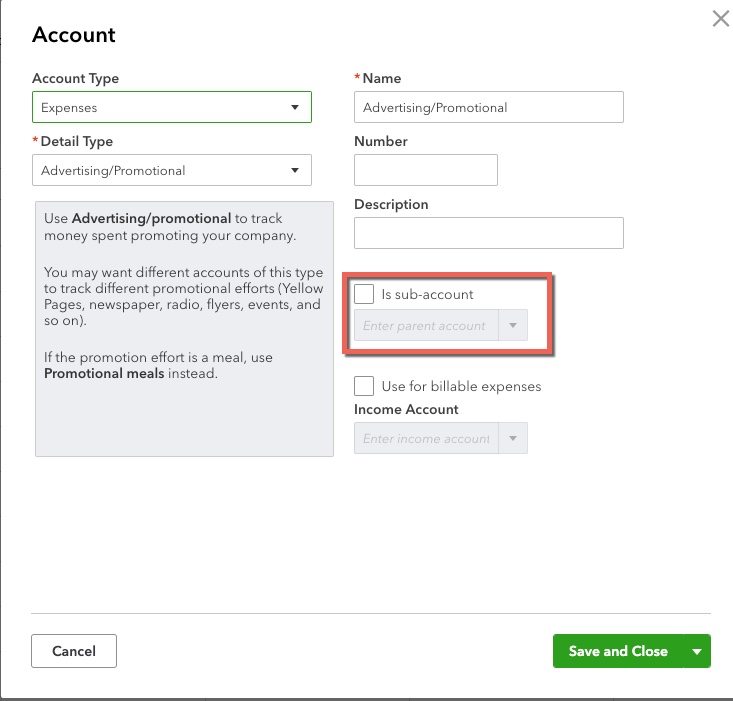
To create a sub-account, just go to create a new account and select the option to create it as a sub-account. From there, you’ll also see a drop-down as to which account should be the parent of the account you are creating. You’ll just want to make sure your parent and sub-accounts are the same account type.

- Limit Your Account Listing
Finally, I am going to beg you to limit your account listing. In QuickBooks Online Simple Start, Essentials, and Plus, you are limited to 250 accounts. I could argue all day long with you that you don’t need that many. But, at the very least, avoid these common mistakes:
Creating an account for each vendor
Most people do this because they want to know how much they are spending with each vendor. Well, as long as you are entering the vendor name on your transactions, there are other reports available to you in QuickBooks Online to help you figure this out. You could even customize your P&L to only show transactions for a certain vendor.
Another issue is that you might be paying your vendor for several different types of things. Maybe you have an IT consultant that is buying you computers and providing you with consulting services to maintain those computers. You probably want to expense those transactions into 2 different accounts – computers and consultants – or something like that. This way you have a clearer idea on what you actually spent on computers in a year.
Creating an account for some sort of expense you expect to have in the future
If you haven’t figured it out yet, I like to condense the chart of accounts so that it is easier to read and review. So, if you create a bunch of accounts for a future expense or even an expense that you incur just once a year, that is going to create a lot of extra stuff to sift through. Instead, I like to just create an “Other” account. Maybe it is “Other Administrative Expenses” or “Other Travel Expenses”. It is a great place to book things that you just aren’t sure if it applies to one of the other accounts. You still have the flexibility to add an account in the future if you do run into a lot of transactions that warrant a separate account.
Wrapping It All Up
So, those are my tips on customizing your QuickBooks Online Chart of Accounts. It does take some planning and strategy, but it can have a huge payoff for you and your business.
I’d love to hear from you. Do you have any recommendations on how to customize your chart of accounts? Have you run into any issues? Or, do you have any other tips that you’d like to share? Leave a comment below.